Although long-time Windows users and developers, we wanted to try Linux on a thumb drive. We could have installed Linux to a disk partition and dual-booted, but we often change computers, and liked the idea of bringing our Linux with us– much harder to do with Windows due to licensing issues! We tried various “Live Linux” distributions designed to boot from a thumb drive with data persistence, but they have a big drawback: Updating to the next major version is not possible. With significant Ubuntu releases appearing every six months or so, we really wanted update capability.
Here is our procedure. You might have a better way:
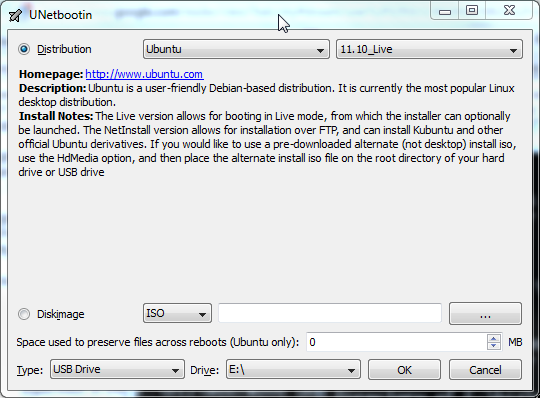
1) Create a bootable Ubuntu USB drive using the free UNetBootin Windows application on a spare thumb drive, not our final thumb drive.
2) Restart the computer, hit F2 to go into BIOS settings, and disable the hard drive. We don’t want to accidentally install a boot loader or anything on our hard drive that interfere with booting Windows later.
3) Boot Ubuntu from the temporary thumb drive. Insert the destination thumb drive and select “Install Ubuntu“, and follow any prompts.
4) If everything went right, we have created a bootable USB drive that runs Ubuntu and is capable of system updates.
5) Ubuntu booted fine, but did not hibernate successfully. Using Synaptic Package Manager, we installed the “hibernate” package, and all seems to work with no extra setup.
6) Of course one will want to install several Sagebrush Systems programs, so install Wine as described in our previous article.
For the thumb drive, we wanted the smallest physical size possible, since the device would often be inserted into a netbook propped on a lap or carried in a backpack, so anything that stuck out far enough to snap off or fall out would be bad. If our computers could boot from an SD Card, then we would have used that instead of a USB drive, but SD Cards are not supported with any BIOS we tried.
We settled on this low-profile microSDHC reader, with a 16GB Class 2 flash card, which was the fastest and largest memory we could afford at the time.
Class 2 means a sustained minimum write speed of 2 MB/s, which is somewhat slower than generic USB flash drives. In practice, the drive is fast enough for our purposes. In the table below we measure boot time to first web page access, which is a more useful metric than measuring to desktop displayed. In our experience a Windows 7 computer might not be ready to do useful work for many seconds after the desktop is displayed after cold boot, as start-up programs continue to load, virus scanners do mysterious tasks, and background services initialize. Additionally, the Windows 7 Wifi drivers on our machine seemed to take quite a long time to load, acquire an IP address, and load an initial complex web page.
| Comparison of Start-up Times (seconds) | Win7 on hard drive | Ubuntu 11.10 on flash drive |
|---|---|---|
| Cold boot time to first web page loaded | 104 | 122 |
| Return-from-hibernate to first web page loaded | 80 | 76 |
Test conditions: Computer is Asus Eee PC 1015PED netbook with N450 processor, running Firefox with one tab, re-loading the Sagebrush Systems homepage. Windows 7 was not optimized by removing unnecessary start-up programs and services, to illustrate a typical user case. Times given are an arithmetic mean of three measurements. Your mileage may vary.
Related articles:
Installing WinChime on Ubuntu Linux
Installing RecAll-PRO and RecAll on Ubuntu Linux