(or Streaming Audio, or Anything Else Coming Out of Computer Speakers)
Hi, I’ve got a problem perhaps you can help me with. I need to transfer an organ suite I wrote to CD so I can send in my application to a music composition class over summer. My sheet music editor doesn’t have an easy way to write to CD. Can you help?
Sure, we can do this! Your music editor can play back music for you to listen, right?
Yes, I know how to set this to play through my computer or through my MIDI keyboard.
For our mission, we will play through computer speakers. This procedure will be a lot easier if you are running on an XP machine instead of Vista. You’re on XP? Great! Your computer is taking MIDI note information and converting, or rendering, into digital audio (and eventually analog voltage) and sending to computer speakers. We’ll just use RecAll-PRO to record a Wave file. Then we use the software that came bundled with your CD-R drive to make an audio CD. Now, some CD burning software isn’t capable of transcribing .WAV file formats to the format necessary for writing to CD, so let’s configure PRO to record in the correct format. We want PCM (No compression) Wave file,44100 sample rate, stereo, 16 bit.
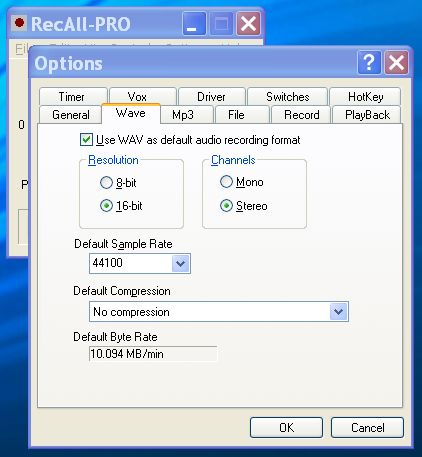
While we are working with PRO, what other settings should we change?
Good question. We don’t want sound-activated recording, so set Vox level on the main window to zero.
Under Options-> Preferences, on the Record tab select “Manual”, on the Driver tab select your sound card input if you have multiple sound devices, and on File tab set “At file limit” to “No action”. Start a new file if you already have an audio file open.
Now we need to configure the sound card controls. Double-click on the speaker icon on your taskbar tray. If you don’t have that icon (Your system might not be set up to display that icon, or sometimes tray icons disappear due to a known bug.) click on RecAll-PRO menu Options-> Mixer Play Control.
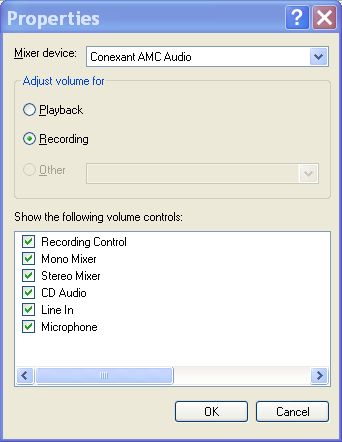
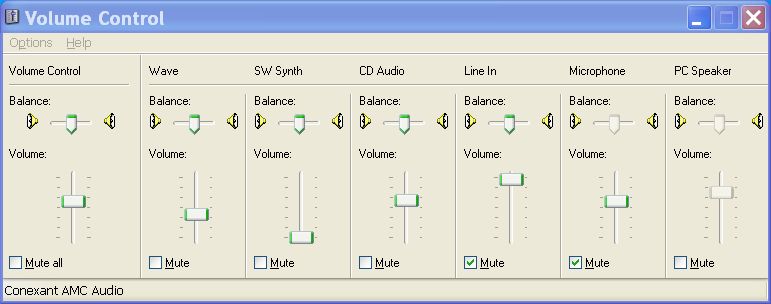 We need to switch this to “Record Control”. Click on the Play Control menu Options-> Properties and select “Adjust volume for : Recording”. Also, select the correct “Mixer device” if you have more than one sound device installed on your computer. Finally, select all control inputs visible, and click OK.
The window title should change from “Play Control” or “Volume Control” to”Record Control”.
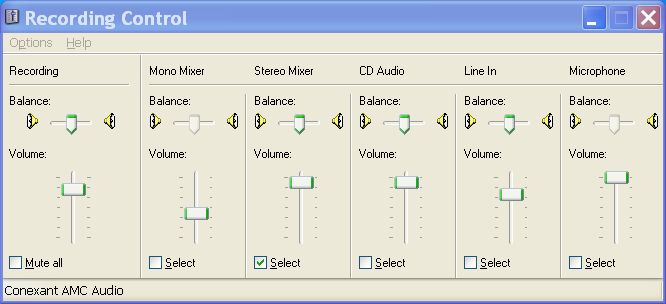
We need to select which sound card input is used for recording. You must understand that only one input can be selected for recording at any one time.Along with the expected inputs “Microphone” or “Line In”, look for an input with a name “Wave”, “Stereo Mixer”, or “What U Hear”.
Found it! So we click the “Select” box next to that input and adjust the volume slider for that input?
That’s right. This input records anything coming out your computer speakers,which could be a mixture of MIDI, streaming audio, Windows sound events,microphone, or whatever. Now click Record button on PRO and start playing the piece on your music notation editor.
The level meter is moving up and down on PRO, so it must be recording. But I see the meter is sometimes going to 100%. Does that mean clipping?
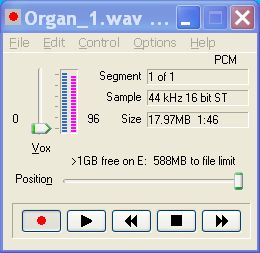
Good observation. Adjust the level slider on “Record Control” for the”Stereo Mixer” so you don’t get clipping. Then start an new file, record the entire composition, and burn your CD!
In a later article, we will discuss how to accomplish this task using Windows Vista. This Windows version will not provide a “Stereo Mixer” recording input, so we need to find another way. Also, the “Play Control” and “Record Control” windows are just different enough to be tricky.